Creating roles
Roles contain the permissions for each role. You assign a role when adding a new user.
To add a new role:
- Go to Admin > Roles.
- Click Add Role.
- Enter the following information in the General tab:
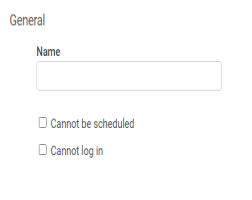
- Name: The name of the role.
- Cannot be scheduled: Select this checkbox if you do not want users with this role to show in the list for schedulers assigning users time blocks. Note: If this box is checked the users with this role will not be able to see and sign up for open shifts or swap time blocks with other users. See Swap and Sign up for more information
- Cannot log in: Select this checkbox if you want users with this role to be disabled from logging into WorkSchedule.Net.
- Enter the following information in the Area tab:
- Categories: Select this checkbox to give the role the ability to manage categories.
- Roles: Select this checkbox to give the role the ability to manage roles.
- Company Settings: Select this checkbox to give the role access to Company Settings.
- Automation: Select this checkbox to give the role access to Automation
- Time Off Ledger:Select this checkbox to give the role access to Time Off Ledger
- Time Clock IPs:Select this checkbox to give the role access to Time Clock IPs
- Import: Select this checkbox to give the role access to the Import module.
- Export: Select this checkbox to give the role access to the Export module.
- Reports: Select this checkbox to give the role access to the Reports module.
- Holidays & Days off: Select this checkbox to allow the role to block off holidays and days off.
- Modify Billboard: Select this checkbox to give the role ability to modify the Billboard.
- Manage Templates: Select this checkbox to give the role permission to add, remove, and edit template configurations.
- Billing: Select this checkbox to give the role permission to view billing.
- Billing and Subscription: Select this checkbox to give the role permission to view billing and modify or cancel the subscription.
- API: Select this checkbox to give the role to have access to the public API.
- Enter the following information in the Employee tab:
- View schedule for: Select from the drop down menu what schedule this role can view.
- Allow to see schedule history: Indicate whether or not you want your employee to be able to view scheduled shifts that are in the past
- Can confirm/decline scheduled shifts: This allows the user to confirm or decline scheduled shifts.
- Allow bidding: Selecting this box allows the employee to bid on open shifts. This works in conjunction with the bidding feature in Company settings.
- Attendance: Select if the employee will be able to:
- Use Time Clock: Select this checkbox if users in this role can use the Time Clock
- Restrict time clock by IP address Select this checkbox if users in this role if use of the time clock is restricted by IP address.
- Allow employee to edit their time sheet: Select this checkbox if users in this role can edit their time sheet
- Availability: Select whether the role can see or modify their availability
- Time off: Select this checkbox to give the role the ability to request time off
- Change Requests: Select whether the role is allowed to:
- View schedule for: Select from the drop down menu what schedule this role can view.
- Enter the following information in the Schedule/Attendance tab:
- View schedule as read-only: Select this checkbox to give the role read-only access to the Schedule module. This means that the user cannot add or edit any data and can only view the Information tab on the Schedule.
- Access for: Select whether the role can access the Schedule for all locations or only the specific location to which the role is assigned.
- Can add on-the-fly category items: Select this checkbox to give the role the ability to add category items in the Schedule (instead of having to exit the Schedule to add in Items > [category name]).
- Can post the schedule: Select this checkbox to give the role the ability to post to the schedule.
- Enter the following information in the Administration tab:
- Manage user accounts for: Select whether the role can manage user accounts for all locations or only specific ones.
- Can assign roles: Select whether the role can assign all roles or only specific ones.
- Can manage category items for: Select whether the role can mange category items for all categories, specific categories or no categories.
- Can view and restore deactivated users: Select this checkbox to allow the role to view and restore deactivated users.
- Enter the following information in the Alerts tab:
- Administrate schedule change alert rules:Select this checkbox to allow the role to administrate schedule change alert rules. For more information about schedule change alerts, see Schedule Change Alerts.
- Enter the following information in the Views tab
- Can add, edit, and delete public views: Select this checkbox to allow the role to add, edit, and delete public views. For more information about views, see Managing Views.
- Can have private views: Select this checkbox to allow the role to create and manage private views.
- Enter the following information in the Security tab:
- Session time out (in minutes): Enter the number of minutes of inactivity until the system times out for this role.
- Click Save to save the role.
Copyright © 2021 Program Works